
I. Introduction
II. History of Nail Art
III. Different Types of Nail Art
IV. Materials and Tools Needed for Nail Art
V. Steps for Creating Nail Art
VI. Tips for Getting Started with Nail Art
VII. Common Mistakes to Avoid When Doing Nail Art
VIII. How to Keep Your Nail Art Looking Fresh
IX. Where to Find Inspiration for Nail Art Designs
X. FAQ
| Topic | Features |
|---|---|
| Nail Art |
|
| Nail Art Design |
|
| Nail Art Trends |
|
| Nail Art Inspiration |
|
| Nail Art Tutorial |
|

Table of Contents
II. History of Nail Art
Nail art has been around for centuries, with evidence of its practice dating back to ancient Egypt. In those days, nail art was reserved for royalty and the wealthy, and it was used to symbolize social status and wealth.
Nail art became more popular in the 20th century, and it began to be seen as a form of self-expression. In the 1920s, nail art was often used to create bold and colorful designs, while in the 1950s, it was more common to see simple and understated designs.
In the 1960s, nail art really began to take off, and it became increasingly popular with both men and women. During this time, new techniques and materials were developed, which allowed for more creative and elaborate nail art designs.
Today, nail art is more popular than ever, and it is seen as a way to show off your personality and style. There are endless possibilities when it comes to nail art, and you can create anything from simple and understated designs to elaborate and over-the-top looks.
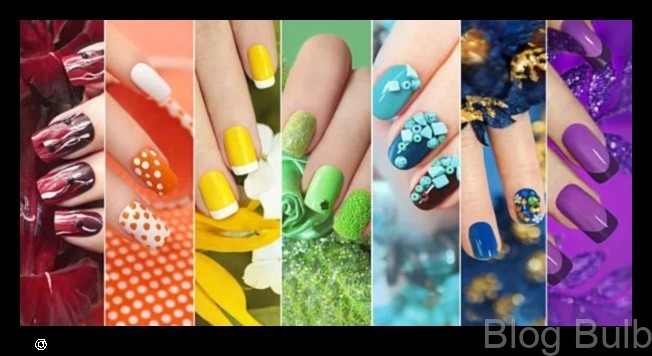
III. Different Types of Nail Art
Nail art can be divided into two main categories: traditional nail art and 3D nail art.
Traditional nail art is the type of nail art that has been around for centuries. It involves painting nails with different colors and designs, and adding embellishments such as glitter, beads, and rhinestones.
3D nail art is a newer type of nail art that involves creating three-dimensional designs on nails. This can be done using a variety of techniques, such as stamping, sculpting, and painting.
Here are some of the most popular types of traditional nail art:
- French manicure
- Ombre nails
- Negative space nails
- Marbled nails
- Glitter nails
And here are some of the most popular types of 3D nail art:
- Stamped nails
- Sculpted nails
- Painted nails
- Water decals
- Nail art jewelry
No matter what your style, there is a type of nail art out there for you. Experiment with different colors, designs, and techniques to find the look that you love.

IV. Materials and Tools Needed for Nail Art
The following materials and tools are essential for creating nail art:
- Nail polish in a variety of colors
- Nail art brushes
- Nail art pens
- Nail art stickers
- Nail art gems
- Nail art glitter
- Nail art foil
- Nail art tape
- Nail art stencils
In addition to these basic materials, you may also want to invest in some additional tools that can help you create more complex nail art designs. These include:
- A UV light (for gel nail art)
- A nail drill (for removing nail polish or creating designs)
- A cuticle pusher (for pushing back cuticles)
- A nail file (for shaping nails)
- A buffer (for smoothing out nails)
With the right materials and tools, you can create any nail art design you can imagine. So get creative and have fun!
V. Steps for Creating Nail Art
Creating your own nail art can be a fun and rewarding experience. However, it’s important to have a good understanding of the steps involved in order to achieve the best results. Here are the basic steps for creating nail art:
- Prepare your nails by filing and shaping them.
- Apply a base coat to protect your nails.
- Choose the colors and designs you want to create.
- Apply the polish to your nails, using a thin layer for each color.
- Use a dotting tool or toothpick to create designs.
- Seal the polish with a top coat.
For more detailed instructions on creating specific nail art designs, you can find many helpful tutorials online. With a little practice, you’ll be able to create beautiful and unique nail art looks that will turn heads wherever you go.
VI. Tips for Getting Started with Nail Art
Here are some tips for getting started with nail art:
- Choose a few simple designs to start with. You don’t want to get overwhelmed by trying to do too much too soon.
- Practice on your non-dominant hand first. This will help you get the hang of the technique without worrying about messing up your real nails.
- Use quality nail polishes and tools. This will make a big difference in the final look of your nails.
- Don’t be afraid to experiment! There are endless possibilities when it comes to nail art, so have fun and see what you can create.
VII. Common Mistakes to Avoid When Doing Nail Art
When it comes to nail art, there are a few common mistakes that people tend to make. Avoiding these mistakes can help you create a more polished and professional look.
-
Not preparing your nails properly. Before you start applying any nail art, it’s important to make sure that your nails are clean and free of any oils or lotions. This will help the nail polish adhere better and prevent it from chipping or peeling.
-
Using too much polish. When applying nail polish, it’s important to use a thin coat. This will help the polish dry faster and prevent it from becoming thick and clumpy.
-
Not using a base coat. A base coat is a thin layer of polish that is applied before the colored polish. It helps to protect your nails from the chemicals in the colored polish and can also help the polish to last longer.
-
Not using a top coat. A top coat is a clear layer of polish that is applied after the colored polish. It helps to protect the colored polish from chipping or peeling.
-
Not letting your nails dry completely. Before you apply any nail art, it’s important to let your nails dry completely. This will help to prevent the nail art from smudging or running.
-
Rushing the process. Nail art can be a lot of fun, but it’s important to take your time and do it right. Rushing the process can lead to mistakes that will be difficult to fix.
By avoiding these common mistakes, you can create beautiful and long-lasting nail art that will make you look and feel your best.
How to Keep Your Nail Art Looking Fresh
Nail art is a great way to express your personality and style, but it can be difficult to keep your nails looking fresh and stylish for more than a few days. Here are a few tips for keeping your nail art looking its best:
- Use a good base coat and top coat. A base coat will help to protect your nails from the color and the top coat will help to seal in the color and prevent it from chipping.
- Apply your nail art in thin layers. Thick layers of polish are more likely to chip and peel.
- Be careful not to over-buff your nails. Buffing your nails too much can damage the nail plate and make it more likely to chip.
- Avoid using harsh chemicals on your nails. Harsh chemicals, such as nail polish remover, can dry out your nails and make them more likely to break.
- Keep your nails clean and dry. Dirty and wet nails are more likely to chip and peel.
- Reapply your nail art every few days. If your nail art starts to chip or peel, reapply it to keep it looking fresh.
By following these tips, you can help to keep your nail art looking fresh and stylish for longer.
There are many places to find inspiration for nail art designs. Here are a few of the best places to start:
- Online nail art galleries. There are many websites that feature galleries of nail art designs. You can browse through these galleries to get ideas for your own nails. Some popular online nail art galleries include:
- Social media. Social media is another great way to find inspiration for nail art designs. You can follow nail artists on Instagram, Pinterest, and Facebook to see their latest work. Some popular nail art Instagram accounts include:
- Magazines. Magazines are a great way to see the latest nail art trends. You can find nail art tutorials and inspiration in magazines like:
- Nail salons. If you’re looking for some inspiration for your next nail art look, visit a local nail salon. You can see what the nail artists are creating and get some ideas for your own nails.
X. FAQ
Q: What is nail art?
A: Nail art is the process of decorating fingernails and toenails with paint, polish, or other materials.
Q: What are the different types of nail art?
A: There are many different types of nail art, including:
- French manicure
- Ombre nails
- Galaxy nails
- Animal print nails
- 3D nails
Q: How do I get started with nail art?
A: Here are a few tips for getting started with nail art:
- Choose a few simple designs to start with.
- Practice on your non-dominant hand.
- Use high-quality nail polish and tools.
- Don’t be afraid to experiment!
Maybe You Like Them Too
- How to Detangle Curly Hair Without Damaging It
- Sole Mates A Guide to Finding the Perfect Shoes for Every Outfit
- Beauty Beyond Borders When Fashion and Makeup Collide
- 50 Chic Wedding Hairstyles for the Modern Bridesmaid
- The Best Shampoos for Hair Extensions A Guide to Keeping Your Extensions Healthy
