Table of Contents
How to Contour Your Face
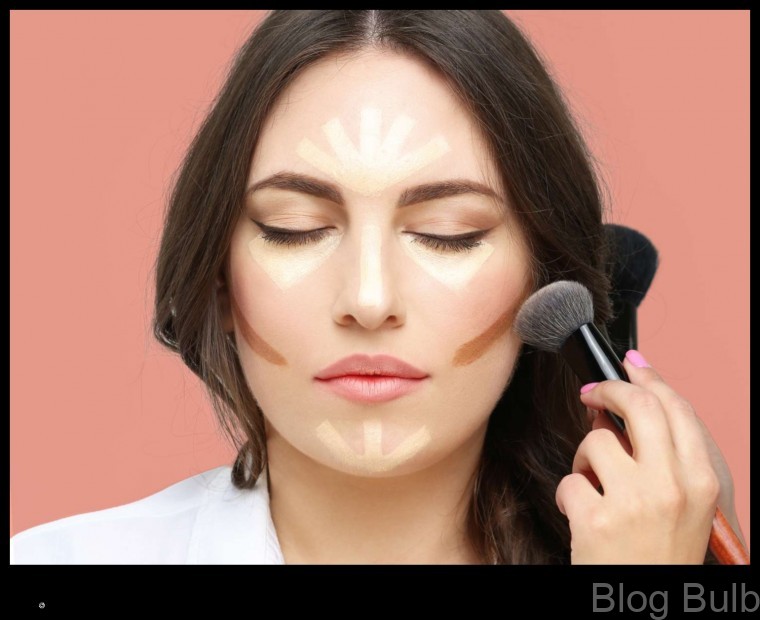
Contouring is a makeup technique that uses light and shadow to create a more defined and sculpted look. By applying darker shades of makeup to areas you want to recede and lighter shades to areas you want to stand out, you can create the illusion of a more chiseled jawline, a higher cheekbone, and a smaller nose.
If you’re new to contouring, it can be helpful to watch a tutorial or read a step-by-step guide before you start. This will help you understand the basic principles of contouring and how to apply the different products.
Here are the basic steps for contouring your face:
- Start with a clean, moisturized face.
- Apply a primer to help your makeup stay in place.
- Use a foundation or BB cream that matches your skin tone.
- Apply a concealer to highlight any areas you want to brighten, such as the inner corners of your eyes, the bridge of your nose, and your Cupid’s bow.
- Use a contour powder that is one to two shades darker than your skin tone. Apply the contour powder to the hollows of your cheeks, along your jawline, and under your chin.
- Use a bronzer to warm up your skin and create a sun-kissed glow. Apply the bronzer to the tops of your cheekbones, your forehead, and your temples.
- Use a highlighter to add a touch of brightness to your face. Apply the highlighter to the high points of your cheekbones, your brow bone, and the bridge of your nose.
- Set your makeup with a translucent powder.
Here are some tips for perfect contouring:
- Use a light hand when applying contour powder. You don’t want to overdo it, or you’ll end up with a muddy look.
- Blend, blend, blend! Blend your contour powder until it’s seamlessly blended into your skin.
- Use a bronzer that is warm and flattering to your skin tone.
- Use a highlighter that is shimmery and reflective.
- Don’t forget to set your makeup with a translucent powder.
Here are some common mistakes to avoid when contouring your face:
- Using too much contour powder.
- Applying contour powder in harsh lines.
- Not blending your contour powder enough.
- Using a bronzer that is too cool or too dark for your skin tone.
- Using a highlighter that is too glittery or too bright.
With a little practice, you’ll be able to contour your face like a pro!
Here is a final look at the finished product:

Q: What are the different types of contouring brushes?
A: There are a few different types of contouring brushes, each designed for a specific purpose. Here are the most common types:
- Contouring brush: This is a large, fluffy brush that is used to apply contour powder.
- Bronzing brush: This is a smaller, angled brush that is used to apply bronzer.
- Highlighting brush: This is a small, pointed brush that is used to apply highlighter.
Q: What is the best way to apply contour powder?
A: The best way to apply contour powder is to use a fluffy brush and lightly dust it over the areas you want to contour. Start by applying the contour powder to the hollows of your cheeks, along your jawline, and under your chin. Then, blend the contour powder into your
| Feature | Answer |
|---|---|
| Contouring | The process of using makeup to create shadows and highlights on the face to create a more defined and sculpted look. |
| Face | The part of the body that includes the forehead, eyes, nose, mouth, cheeks, and chin. |
| Makeup | Products used to enhance the appearance of the face, such as foundation, concealer, blush, eyeshadow, eyeliner, mascara, and lipstick. |
| Tutorial | A step-by-step guide on how to do something. |
| Video | A visual recording of something, such as a tutorial or a performance. |
II. Tools and Materials
The following are the basic tools and materials you will need for contouring:
- Contouring powder
- Bronzer
- Blush
- Highlighting powder
- Angled brush
- Small fluffy brush
- Kabuki brush
- Sponge
You can also use other tools and materials, such as a beauty blender, a stippling brush, or a concealer brush. However, the tools and materials listed above are the most basic and essential for contouring.
III. The Basics of Contouring
Contouring is a makeup technique that uses shadows and highlights to create the illusion of a more defined and sculpted face. By using darker shades of makeup to create shadows in areas you want to recede, and lighter shades to create highlights in areas you want to emphasize, you can create a more balanced and symmetrical look.
Contouring is a great way to add dimension to your face and create a more polished look. It can also be used to correct the appearance of asymmetries or to minimize problem areas, such as a round face or a double chin.
If you’re new to contouring, it’s important to start with a light hand and build up the intensity gradually. You don’t want to end up with a harsh or unnatural-looking finish.
Here are the basic steps for contouring your face:
- Start by prepping your skin with a primer. This will help to create a smooth base for your makeup and help the contour powder to stay in place.
- Apply a foundation that matches your skin tone all over your face.
- Use a concealer that is one shade lighter than your foundation to highlight your cheekbones, brow bone, Cupid’s bow, and bridge of your nose.
- Use a contour powder that is two shades darker than your foundation to create shadows in the hollows of your cheeks, under your jawline, and along your hairline.
- Blend the contour powder into your skin using a fluffy brush.
- Apply a blush that is one shade lighter than your contour powder to the apples of your cheeks.
- Set your makeup with a translucent powder.
Once you’ve mastered the basic steps of contouring, you can experiment with different shades and techniques to create a look that’s perfect for you.

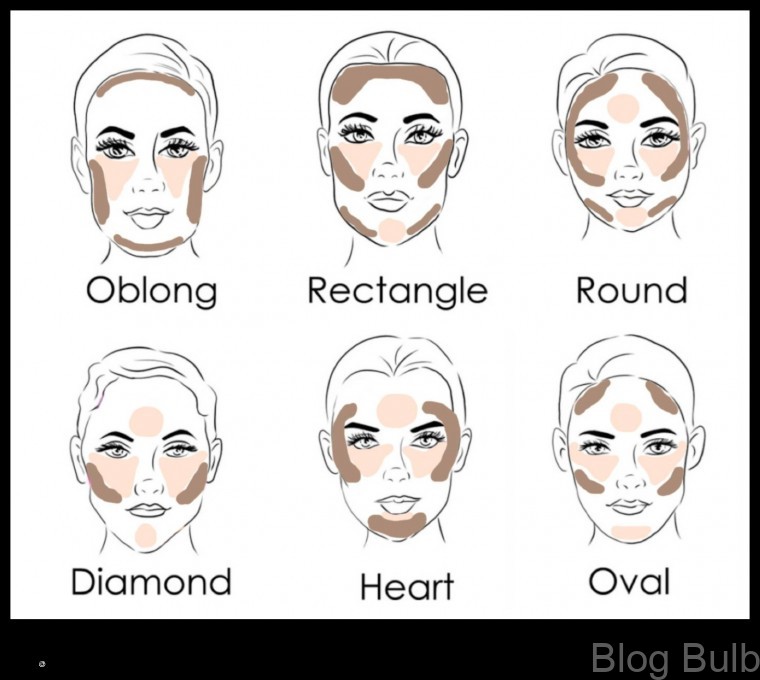
IV. Contouring for Different Face Shape
The best way to contour your face is to use the right products and techniques for your individual face shape. Here are some tips for contouring different face shapes:
- Oval face: Oval faces are considered to be the most symmetrical face shape, so they don’t require much contouring. To add a little definition, you can use a light shade of contour powder to shade along the sides of your forehead, under your cheekbones, and along your jawline. You can also use a bronzer to add warmth to your temples and cheeks.
- Round face: To create a more angular look on a round face, you can use a dark shade of contour powder to shade along the sides of your forehead, under your cheekbones, and along your jawline. You can also use a bronzer to add warmth to your temples and cheeks.
- Square face: To soften the angular features of a square face, you can use a light shade of contour powder to shade along the sides of your forehead, under your cheekbones, and along your jawline. You can also use a bronzer to add warmth to your temples and cheeks.
- Heart-shaped face: To balance out the wider forehead and narrower chin of a heart-shaped face, you can use a light shade of contour powder to shade along the sides of your forehead and under your cheekbones. You can also use a bronzer to add width to your temples and chin.
- Triangular face: To create a more balanced look on a triangular face, you can use a light shade of contour powder to shade along the sides of your forehead and under your cheekbones. You can also use a bronzer to add width to your forehead and chin.
V. Highlighting for Different Face Shape
Highlighting is a great way to add dimension and definition to your face. By using a light-reflecting product, you can create the illusion of a lifted and chiseled look. Here are some tips for highlighting different face shapes:
- Oval face: Apply highlighter to the tops of your cheekbones, down the bridge of your nose, and on the Cupid’s bow of your lips.
- Round face: Apply highlighter to the tops of your cheekbones, along your jawline, and on the temples.
- Square face: Apply highlighter to the tops of your cheekbones, along your jawline, and on the forehead.
- Heart-shaped face: Apply highlighter to the tops of your cheekbones, down the bridge of your nose, and on the Cupid’s bow of your lips.
- Diamond-shaped face: Apply highlighter to the tops of your cheekbones, along your jawline, and on the temples.
When highlighting, it’s important to use a light touch and blend well. You don’t want to create a harsh or unnatural look.
VI. Common Mistakes to Avoid
When contouring, it is important to avoid making these common mistakes:
- Using too much product: This can make your face look unnatural and cakey.
- Applying the contour too dark: This can create a harsh look.
- Applying the contour too close to your hairline: This can make your face look wider.
- Not blending the contour well: This can create a harsh line between your contour and your natural skin tone.
To avoid these mistakes, it is important to use a light hand when applying contour powder, bronzer, and blush. It is also important to blend the product well so that there is no harsh line between your contour and your natural skin tone.
VII. How to Apply Contouring Makeup
To apply contouring makeup, you will need the following:
- A contour powder
- A bronzer
- A blush
- A fluffy brush
- A small angled brush
- A makeup sponge
Once you have gathered your materials, you can begin applying your contouring makeup.
- Start by applying a small amount of contour powder to the hollows of your cheeks.
- Blend the contour powder into your skin using a fluffy brush.
- Apply a small amount of bronzer to the tops of your cheekbones, your temples, and your jawline.
- Blend the bronzer into your skin using a fluffy brush.
- Apply a small amount of blush to the apples of your cheeks.
- Blend the blush into your skin using a makeup sponge.
Once you have finished applying your contouring makeup, you should have a more defined and sculpted look.
Tips for Perfect Contouring
Here are some tips for perfect contouring:
- Use a light hand when applying contour powder. You don’t want to overdo it, or you’ll end up with a harsh look.
- Blend, blend, blend! Contour powder should be blended well into the skin to create a natural-looking finish.
- Use a bronzer that is one or two shades darker than your natural skin tone. This will help to create a more sculpted look.
- Highlight the areas of your face that you want to bring forward, such as the cheekbones, brow bone, and Cupid’s bow.
- Use a blush that is one or two shades lighter than your natural skin tone. This will help to add warmth and dimension to your face.
- Don’t forget to blend your blush into your contour and highlight.
- Experiment with different contouring techniques until you find one that you like.
- Practice makes perfect! The more you contour, the better you’ll get at it.
IX. Final Look
Once you have finished contouring and highlighting your face, you should have a more defined and sculpted look. Your cheekbones should be more pronounced, your jawline should be more angular, and your face should look slimmer and more lifted.
Here are some tips for achieving a natural-looking contour:
- Use a light hand when applying contour powder. You don’t want to overdo it, or you’ll end up looking like a clown.
- Blend, blend, blend! Make sure to blend the contour powder into your skin well so that there are no harsh lines.
- Use a bronzer that is one or two shades darker than your natural skin tone.
- Highlight the areas of your face that you want to bring forward, such as your cheekbones, brow bone, and Cupid’s bow.
- Don’t forget to add a touch of blush to your cheeks to give your face a natural glow.
With a little practice, you’ll be able to contour your face like a pro and achieve a more chiseled and sculpted look.
X. FAQ
Question 1: What is contouring?
Answer 1: Contouring is a makeup technique that uses light and shadow to create the illusion of a more defined and sculpted face. By applying darker shades of makeup to areas that you want to recede, and lighter shades to areas that you want to stand out, you can create a more balanced and flattering look.
Question 2: What are the different types of contouring brushes?
Answer 2: There are a variety of contouring brushes available on the market, each with its own unique purpose. Some of the most popular types of contouring brushes include:
- Highlighting brush: This brush is used to apply light-reflecting products to the high points of the face, such as the cheekbones, brow bone, and Cupid’s bow.
- Bronzing brush: This brush is used to apply bronzer to the areas of the face that you want to warm up and contour, such as the temples, jawline, and forehead.
- Blending brush: This brush is used to blend the edges of your contouring and highlighting products together to create a seamless look.
Question 3: What are the common mistakes to avoid when contouring?
Answer 3: There are a few common mistakes that people make when contouring that can result in a less-than-flattering look. Some of the most common mistakes include:
- Using too much product: Using too much product can make your face look muddy and unnatural.
- Applying the product in the wrong places: Contouring should be applied to the areas of your face that you want to recede, such as the temples, jawline, and forehead.
- Not blending the product properly: Blending the edges of your contouring and highlighting products together is essential to creating a seamless look.
Maybe You Like Them Too
- How to Detangle Curly Hair Without Damaging It
- Sole Mates A Guide to Finding the Perfect Shoes for Every Outfit
- Beauty Beyond Borders When Fashion and Makeup Collide
- 50 Chic Wedding Hairstyles for the Modern Bridesmaid
- The Best Shampoos for Hair Extensions A Guide to Keeping Your Extensions Healthy

