
Table of Contents
Glam Goddess: Elevating Your Makeup Game
This tutorial will teach you how to apply makeup in a way that makes you look more glamorous. We’ll cover everything from basic makeup techniques to more advanced tips and tricks.
Introduction
When it comes to makeup, there are no hard and fast rules. The most important thing is to find a look that you feel confident and comfortable in. However, there are a few general tips that can help you achieve a more glamorous look.
- Start with a clean, well- moisturized face.
- Use a primer to create a smooth base for your makeup.
- Choose products that are specifically designed for your skin type.
- Blend, blend, blend!
The Basics of Makeup
Before you can start creating a glamorous look, you need to know the basics of makeup. This includes learning how to apply foundation, concealer, blush, eyeshadow, eyeliner, and lipstick.
Here are a few tips for applying each type of makeup:
- Foundation should be applied in thin layers, starting from the center of your face and working outward.
- Concealer should be used to cover any blemishes or dark circles.
- Blush should be applied to the apples of your cheeks and blended up towards your temples.
- Eyeshadow should be applied in a light, shimmery shade all over the lid, and then a darker shade in the crease.
- Eyeliner should be applied along the lash line, starting from the inner corner of your eye and working outwards.
- Lipstick should be applied in a bold, matte shade.
Choosing the Right Makeup for Your Skin Type
The type of makeup you use will depend on your skin type. If you have oily skin, you’ll need to choose products that are oil-free and won’t clog your pores. If you have dry skin, you’ll need to choose products that are moisturizing and won’t make your skin look cakey.
Here are a few tips for choosing the right makeup for your skin type:
- Oily skin: Look for products that are oil-free and non-comedogenic.
- Dry skin: Look for products that are moisturizing and won’t make your skin look cakey.
- Combination skin: Look for products that are oil-free for your oily areas and moisturizing for your dry areas.
Applying Makeup for Your Face Shape
The way you apply your makeup will depend on your face shape. If you have a round face, you’ll want to create the illusion of a longer, more angular face. If you have a square face, you’ll want to soften your features and create a more feminine look. If you have an oval face, you’re lucky! You can pretty much wear any makeup you want.
Here are a few tips for applying makeup for your face shape:
- Round face: Use contouring to create the illusion of a longer, more angular face.
- Square face: Use a light, shimmery blush to soften your features.
- Oval face: You can pretty much wear any makeup you want!
Eye Makeup Tutorial
Eye makeup can be the most transformative part of your beauty routine. A well-applied eye makeup can make your eyes look bigger, brighter, and more youthful.
Here is a step-by-step tutorial on how to apply eye makeup:
- Start with a clean, well- moisturized face.
- Apply a primer to your eyelids to create a smooth base for your eyeshadow.
- Apply a light, shimmery eyeshadow all over your eyelid.
-
Choose a foundation that matches your skin tone.
-
Use concealer to cover any blemishes or dark circles.
-
Highlight your cheekbones and brow bone with a shimmery powder.
-
Bronze your skin to create a sun-kissed glow.
-
Use a light dusting of blush to add color to your cheeks.
-
Use a waterproof mascara to give your lashes a lift.
-
Line your lips with a lip liner to create a sharp edge.
-
Finish with a coat of your favorite lipstick.
- If you have oily skin, look for products that are oil-free and non-comedogenic.
- If you have dry skin, look for products that are moisturizing and hydrating.
- If you have sensitive skin, look for products that are hypoallergenic and fragrance-free.
- If you have fair skin, look for foundation and concealer that are one to two shades lighter than your natural skin tone.
- If you have dark skin, look for foundation and concealer that are one to two shades darker than your natural skin tone.
- If you have olive skin, look for foundation and concealer that are a neutral shade that will blend well with your skin tone.
- Oval face: Oval faces are considered to be the most symmetrical, so you can pretty much wear any type of makeup. However, if you want to accentuate your features, you can try highlighting your cheekbones and using a darker shade of blush on the apples of your cheeks.
- Round face: To create a more elongated look, you can use contouring to define your cheekbones and jawline. You can also try using a darker shade of eyeshadow on the outer corners of your eyes and a lighter shade on the inner corners.
- Square face: To soften the angles of your face, you can use a light-coverage foundation and a fluffy brush to blend it out. You can also try using a shimmery highlighter to bring attention to your cheekbones and a matte bronzer to contour your jawline.
- Diamond face: To balance out your features, you can use a darker shade of foundation or concealer on your forehead and chin. You can also try using a brighter shade of blush on the apples of your cheeks and a darker shade on the outer corners of your eyes.
- Heart-shaped face: To draw attention to your eyes, you can use a darker shade of eyeshadow on the outer corners of your eyes and a lighter shade on the inner corners. You can also try using a shimmery highlighter to bring attention to your cheekbones and a matte bronzer to contour your jawline.
- Eyeshadow primer
- Eyeshadow palette
- Eyeliner
- Mascara
- False eyelashes (optional)
- Start with a light hand and build up the intensity of your eyeshadow gradually.
- Blend your eyeshadow well to create a smooth, seamless look.
- Don’t forget to curl your eyelashes before applying mascara.
- Use a waterproof mascara if you want your lashes to stay put all day long.
- Start with clean, moisturized lips.
- Use a lip liner to define the shape of your lips.
- Fill in your lips with a lip color that is one to two shades darker than your natural lip color.
- Use a lip gloss or balm to add shine and definition.
- Use a bright or bold lip color to make a statement.
- Add a touch of shimmer or glitter for a more festive look.
- Layer different lip products to create a custom look.
- A hairdryer
- A round brush
- A styling product (such as hairspray or mousse)
- A comb
- A hair clip
- Start by washing and conditioning your hair.
- Towel-dry your hair until it is damp.
- Apply a styling product to your hair.
- Use a round brush to blow-dry your hair in the direction you want it to go.
- Use a comb to smooth out any flyaways.
- Secure your hair in a hair clip.
- Let your hair cool down completely.
- Remove the hair clip and style your hair as desired.
- If you have curly hair, you may want to use a diffuser instead of a blow-dryer.
- If you have fine hair, you may want to use a light styling product to avoid weighing your hair down.
- If you have thick hair, you may want to use a stronger styling product to help hold your hair in place.
- If you have a pear-shaped body, you’ll want to focus on creating balance by emphasizing your upper body and minimizing your lower body. Choose tops that are fitted in the waist and flared at the bottom, and avoid wearing anything too tight or revealing in the lower half of your body.
- If you have an apple-shaped body, you’ll want to focus on creating a more hourglass figure by drawing attention to your waist. Choose tops that are fitted in the waist and flared at the bottom, and avoid wearing anything too loose or baggy in the waist.
- If you have a rectangular body, you’ll want to create curves by adding volume to your hips and bust. Choose tops that are fitted in the waist and have some volume in the bust and hips, and avoid wearing anything too tight or revealing in the waist.
- If you have an hourglass figure, you’re in luck! You can wear just about anything and look great. Just be sure to choose clothes that fit your curves and accentuate your figure.
- How to Detangle Curly Hair Without Damaging It
- Sole Mates A Guide to Finding the Perfect Shoes for Every Outfit
- Beauty Beyond Borders When Fashion and Makeup Collide
- 50 Chic Wedding Hairstyles for the Modern Bridesmaid
- The Best Shampoos for Hair Extensions A Guide to Keeping Your Extensions Healthy
| Feature | Description |
|---|---|
| Makeup | The art of applying cosmetics to enhance one’s appearance. |
| Beauty | The quality or state of being beautiful. |
| Glam | A stylish and glamorous appearance. |
| Goddess | A female deity or a woman regarded as having divine qualities. |
| Tutorial | A step-by-step guide or demonstration of how to do something. |
II. The Basics of Makeup
The basics of makeup are the foundation for any glamorous look. Here are a few things you need to know to get started:
III. Choosing the Right Makeup for Your Skin Type
The type of makeup you use can make a big difference in how your skin looks. If you have oily skin, you’ll need to use products that won’t clog your pores and cause breakouts. If you have dry skin, you’ll need to use products that will moisturize and help to keep your skin hydrated.
Here are some tips for choosing the right makeup for your skin type:
It’s also important to consider your skin tone when choosing makeup. If you have fair skin, you’ll want to use light-colored makeup that won’t make you look washed out. If you have dark skin, you’ll want to use darker-colored makeup that will help to define your features.
Here are some tips for choosing the right makeup for your skin tone:
Once you’ve chosen the right makeup for your skin type and skin tone, you can start to experiment with different looks and techniques. With a little practice, you’ll be able to create a glamorous makeup look that will make you look your best.
IV. Applying Makeup for Your Face Shape
The shape of your face can determine how you apply makeup to achieve the most flattering look. Here are a few tips for applying makeup for different face shapes:
V. Eye Makeup Tutorial
This tutorial will teach you how to create a glamorous eye makeup look that will make your eyes pop.
You will need the following products:
To begin, apply eyeshadow primer to your eyelids. This will help to create a smooth base for your eyeshadow and prevent it from creasing.
Next, choose an eyeshadow palette that has a variety of colors that will complement your eye color. You can use a neutral palette for a more natural look, or a more colorful palette for a more dramatic look.
Start by applying a light shade of eyeshadow to your entire eyelid. This will create a base for the rest of your eye makeup.
Next, use a medium shade of eyeshadow to create a crease in your eyelid. Blend the eyeshadow up towards your brow bone and out towards your temples.
Use a darker shade of eyeshadow to deepen the crease in your eyelid. You can also use this shade to create a smoky eye by applying it to the outer corners of your eyes.
Line your eyes with eyeliner. You can use a liquid eyeliner or a pencil eyeliner. If you are using a liquid eyeliner, make sure to apply it in thin, even strokes. If you are using a pencil eyeliner, smudge it out with a small brush to create a softer look.
Apply mascara to your eyelashes. You can use a waterproof mascara for a longer-lasting look.
If you want to add a dramatic touch to your eye makeup, you can apply false eyelashes. False eyelashes come in a variety of styles, so you can choose the ones that best suit your eye shape.
Once you have finished applying your eye makeup, take a look in the mirror and make sure you are happy with the results. If you need to make any adjustments, go ahead and do so.
Here are some tips for applying eye makeup:
With a little practice, you can easily create a glamorous eye makeup look that will make you look stunning.
VI. Lip Makeup Tutorial
Lip makeup is an essential part of any glamorous look. Here are a few tips for applying lip makeup like a pro:
Here are a few additional tips for creating a glamorous lip look:
With a little practice, you can create a glamorous lip look that will turn heads wherever you go.
VII. Nail Polish Tutorial
Nail polish is a great way to add a touch of personality to your look. Whether you’re going for a subtle everyday look or a bold statement, there’s a nail polish out there for you.
In this tutorial, we’ll show you how to apply nail polish like a pro. We’ll cover everything from choosing the right color and base coat to applying the polish and finishing with a top coat.
So, if you’re ready to up your nail game, read on!
Step 1: Choose the Right Color
The first step to applying nail polish is choosing the right color. There are a few things to consider when choosing a color, including your skin tone, your outfit, and the occasion.
If you have fair skin, you can wear almost any color of nail polish. However, some colors will look better on you than others. For example, bright, bold colors will really pop against your fair skin. If you have dark skin, you can also wear almost any color of nail polish. However, you may want to avoid colors that are too light, as they can wash you out.
When choosing a color, also consider your outfit. If you’re wearing a bright, colorful outfit, you can choose a matching nail polish color. Or, you can choose a contrasting color to create a more interesting look.
Finally, think about the occasion. If you’re going to a formal event, you may want to choose a more conservative color, such as a neutral or a sheer pink. If you’re going to a casual event, you can have more fun with your color choices.
Step 2: Apply a Base Coat
A base coat is a thin layer of polish that you apply before the colored polish. It helps to protect your nails from the color and also helps the colored polish to last longer.
To apply a base coat, simply paint a thin layer of polish on your nails. Allow it to dry completely before moving on to the next step.
Step 3: Apply the Colored Polish
Now it’s time to apply the colored polish. Start by painting a thin layer of polish on your nails. Allow it to dry completely before applying a second coat.
When applying the colored polish, be careful not to get it on your cuticles. If you do, simply use a small brush or cotton swab to clean it up.
Step 4: Apply a Top Coat
A top coat is a thin layer of polish that you apply after the colored polish. It helps to protect the colored polish and also gives your nails a shiny finish.
To apply a top coat, simply paint a thin layer of polish on your nails. Allow it to dry completely before admiring your beautiful new nails!
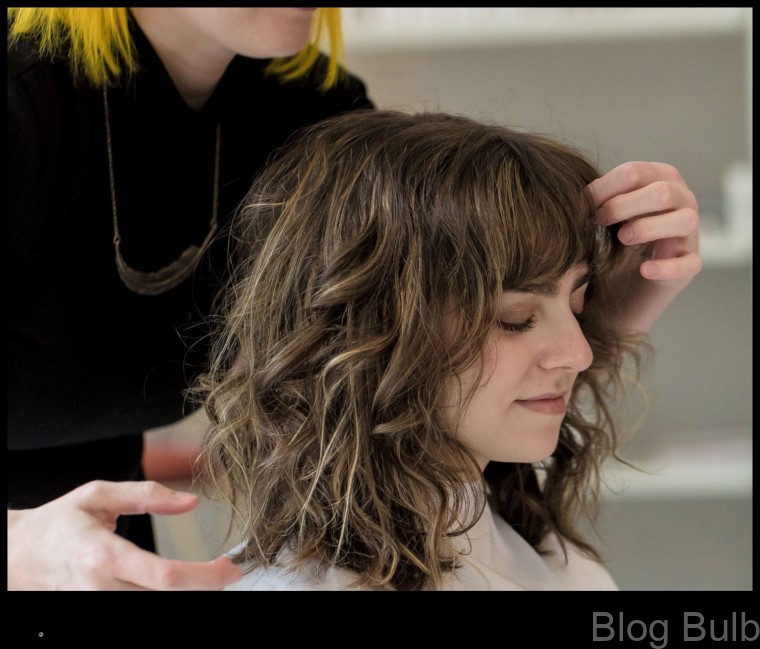
Hairstyling Tutorial
This tutorial will teach you how to create a glamorous hairstyle that will make you look like a goddess.
You will need the following materials:
Instructions:
Tips:
With a little practice, you can create a glamorous hairstyle that will make you look like a goddess.
IX. Wardrobe Tips for Your Body Type
Your body type can affect the way you look in clothes, so it’s important to choose clothes that flatter your figure. Here are a few tips for finding the right wardrobe for your body type:
X. FAQ
Q: What is the best way to apply foundation?
A: The best way to apply foundation is to start with a clean, moisturized face. Then, use a small amount of foundation and apply it in small, circular motions. Be sure to blend the foundation well into your skin so that there are no harsh lines.
Q: What are the best eyeshadow colors for my skin tone?
A: The best eyeshadow colors for your skin tone will depend on your individual skin tone and undertones. However, some general tips include choosing eyeshadow colors that are similar to your skin tone for a natural look, or choosing brighter colors to create a more dramatic look.
Q: What is the best way to apply eyeliner?
A: The best way to apply eyeliner depends on the type of eyeliner you are using. For liquid eyeliner, start by lining the upper lash line with a thin line. Then, go back over the line and thicken it as desired. For pencil eyeliner, start by lining the upper lash line with a thin line. Then, smudge the line with your finger or a Q-tip to create a softer look.

